


I have something of an obsession with thatched roofs....

In fact, it is such an obsession, that when it came time to re-roof our own house, I actually tried to find a Thatcher, which isn't easy here in America. When I learned that our house insurance would be sky-high if I were to be so bold as thatch the roof, I looked into artificial thatch panels.. The prices on the artificial thatch were sky high too. No thatch roof for my real house.

It hasn't stopped me from creating thatched roofs in my books however.
And what better roofing to use on Trimble Manor?
So it looks like I will have my thatched roof after all
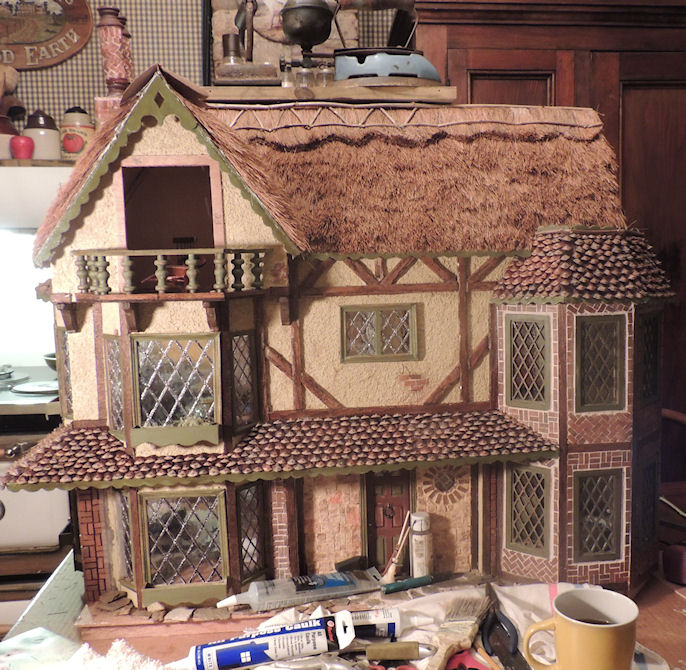
This is nearly the last step on the outside of Trimble Manor: thatching the top roof.
I used something called Coconut fiber, which came in thick bunches.

I had to separate the fibers into small batches,


and using a caulk, row by row, I've lain down the thatch.

It is very time consuming. This roof has taken me 5 days so far.


It's not as if you just lay the batch on top of the roof, I am simplifying that. You really have to work the caulking into the fibers to prevent them from shedding. Then you work, work, work it onto the surface of the roof. I used my 6 inch metal ruler as my tool. I don't think I've ever used that ruler so much in my life!

As each section is laid, it is trimmed and I attempt to create more a uniform "carpet" of thatch. This part is not easy to accomplish. I honestly don't know how they get that smooth look on REAL thatched roofs. It is amazing. What do you call a professional Thatcher?
As I was working on this I thought how much easier it would be to purchase a coconut door mat and just cut it to fit!
As I was working on this I thought how much easier it would be to purchase a coconut door mat and just cut it to fit!

NAH!
This took a lot of fiber, let me tell you....

 .
.
The decorative ridge on the top of the roof looks simple to do, but it's not... I repeat, it is not.

You can see where I have 2 irons sitting on top of the ridge to make it lay flat. Its a tricky roof which will require 3 separate roof ridges.

Here's hoping this roof is finished by the end of the week. I really must get back to the illustrations.
Well, how about that? I almost have my very own thatched roof at last... well, it's really not my house. But my little mouse will be thrilled.


I'm so glad you used a thatched roof even though it was a lot of work. I'm truly amazed at the authentic look you have achieved. It looks like you can add professional thatcher to your resume. ♥
ReplyDeleteMartha, Professional at the mini level!
DeleteThis looks wonderful. All your hard and meticulous work is certainly apparent in that beautiful roof. It's the crowning touch for sure.
ReplyDeleteVic, I have to agree it was the icing on the cake!
DeleteBonjour,
ReplyDeleteTrès jolie publication ! Je suis éblouie par le travail minutieux que vous avez réalisé pour créer ce toit de chaume ! Quel talent !
Dans ma région, il y a un petit village dont les maisons ont uniquement des toits de chaume. Il est magnifique ! Je vous donne le lien où vous pourrez l'admirez. Il s'appelle Moudeyre.
https://www.moudeyres.fr/
Gros bisous 🌸
Martine, je suis allé sur le site, les meilleurs bâtiments de pierre sont ceux avec le chaume. Il ressemble à un endroit merveilleux à visiter !
DeleteWhat a darling house with its thatched roof; I can see it was very time consuming to make.
ReplyDeleteI was nearly done, and then I ran out of thatch..completely. Oh well, I needed a break.
DeleteWhat a boat load of work this is! It has to be very tedious work, but the results are great, Jeri.. I love a thatched roof. Years ago I watched a program on PBS where they were thatching a cottage roof in England.. I was so impressed with the men working on it.. What do you call a professional Thatcher? A ~ Master Thatcher~ ... The house looks beautiful, Jeri. What a lucky mouse!
ReplyDeletePenny, Master Thatcher, that sounds about right. I never dreamed this house would take so long to complete. I've been working on it for a month!
DeleteOH MY STARS........
ReplyDeleteYou and I live vicariously through our miniature creations....you got your dream thatch, and with my humble little paper castle (that I've not yet finished), got my dream turrets and chimney top! Jeri, you again blow my mind and I love your boldness to dream but to make things COME TO BE!!!!!!!!!!! GOSH this is unreal and perfect. And I would imagine that the decorative top, to get it that precise, demands great patience and steadiness and nimbleness of fingers! BRAVO, a job well done!
Anita, My mom always used to say "Oh my Stars!" Definitely living vicariously through my little English Manor House, in the 16th century. The decorative ridge required I make a paper pattern out of an old brown bag, stitch my thatch on with the sewing machine,wet it, glue it, staple it, cut it, bind it with twigs. Oh man! I am glad I did.
DeleteIt's really turning out wonderful. I have seen cottages being re-thatched in England. Seems like it would be a fire hazard.
ReplyDeleteDonna, They surely must use some kind of fire retardant, since there are so many thatched roofs in England. Someone needs to tell us.
DeleteDear Jeri, your brilliant mouse house just gets better and better! xo
ReplyDeleteFrances, Just wait till I do the garden!
DeleteWOW! The thatched roof is beautiful!
ReplyDeleteThank you for taking us on your housing building journey. You are a very good contractor. I think one day there will be a faux thatch that can go on roofs, and it will probably be expensive.
HI May, There is a faux thatch, I had samples sent to me when I wanted to roof our house. But it was SO expensive, I settled for something more suitable for our pocket book AND our house's style.
DeleteIt really is looking great! I keep reading these posts and thinking about how I make my gingerbread houses. The roof in gingerbread would have been those huge shredded wheat cereal blocks (they have the little ones and the giant blocks where you only have one in a bowl?) Yours will certainly last longer!
ReplyDeleteKyra, It just better last longer than Shredded wheat! I really don't want to do this job again.I bet you had some super cute gingerbread homes.
DeleteOh sigh!!!!It is just lovely....I literally swoon over it. Love the colors you have chosen.
ReplyDeleteDebra, Even my husband is liking it. I may have to ask him to put in the lighting... Of course, it has to resemble candlelight and lanterns.
DeleteThis is truly a masterpiece! And you did it YOURSELF! I feel inspired to do a one-room cottage for myself one of these days. I know where to go now for how to do it.
ReplyDeleteCathy, You should do it. I have a few friends who've already bought cottage kits and are planning their own little masterpieces.
DeleteIt is looking quite wonderful, I love thatched roofs!
ReplyDeleteWendy, I do have one real thatched building project here in the Hollow. It's a bird feeding station with a 6foot length roof.
DeleteWood love to see a picture of it Jeri!!
DeleteCan't wait to see how you decorate the interior for your mouse inhabitant!
ReplyDeleteThe house itself is meant to be 16th century, but for the mouse living in it, the year is 1901, so she will have turn of the century furnishings...and a few very old heirlooms from her ancestors.
DeleteSuch a masterpiece! You should be so proud! I know one little mouse who is tickled pink, over the moon, filled with JOY as she watches you on the sidelines. I cannot wait to see the candlelight interior and furnishings! The thatched roof is AMAZING and definitely the icing on this cake!! Watching this cottage develop has been pure JOY to see. Thanks so much for sharing!!I have to admit though as usual I am very excited to see your next book too!! xoxo
DeleteHI Belinda, I have to confess, I'm becoming a bit construction weary. The inside of the house will have to be an ongoing project since I must get on with the drawings. But I really needed for the outside to be finished. It will also take a lot of thought as to how to do the interior rooms.... hmmm, that will be fun! I posted a picture above of our thatched bird station.
ReplyDeleteNumber one, caulk is truly magical! I've used it as glue for the linoleum in our hen house, I've used it to cobble together my diy pond filter, and now I've learned one can also thatch with it!
ReplyDeleteNumber two, the irons resting on the top made me laugh. Aren't we funny that we just grab the first heavy thing we can lay our hands on and make do?! You're the best, Jeri!
Roxie, AND, caulk doesn't smell. Yes, those Irons have come in handy more than once!
ReplyDeleteVisiting from Martha Ellen...there's an Englishman who moved to Tennessee and is a thatcher. He's been here for a while and does lovely work. Your bee skeeps are cute and your thatch job looks grand...well done!
ReplyDeleteSandra, no kidding? I live in Tennessee and would love to find out who this man is. I may be able to have at least a small shop thatched. DO you know his name?
DeleteDear Jeri,
ReplyDeleteLook at you! A thatcher in training in miniature! :) This project is so fun to follow. You'll have to open your own museum some day!
Love,
Marqueta
Marqueta, If we ever finish off a floor in 1/3rd of the barn, I've got a wonderful huge space for my studio/workshop/gallery. It is a goal I do have. When that happens, I hope you will visit us!
Delete